Searching...
Tuesday 30 April 2013
4/30/2013 08:26:00 pm 2

How to resolve Lotus Notes Error “Illegal circular use: ...” ?


I have already discussed that causes for the error: "Illegal circular USE: DocExpProcessing" while working within a database or mail file.

Here, I am going to discuss the resolution method for the above error.

Error resolution steps:
First ensure that the prohibit flag hasn’t been set for any of the database design elements but still if you are facing the same problem then, you need to replace the database design.

Follow the given steps to replace the database design:
  • Note the design element mentioned in the error
  • Delete the design element
  • Right-click the database bookmark or workspace icon and select Database > Refresh Design or Replace Design (as desired) to refresh or replace the design.


For any design elements which are set to "Prohibit design refresh or replace to modify" you will want to: 

1. Open the main window of Domino Designer client and select the design element
2. Go to Design > Design Properties then, select the Design tab and uncheck the "Prohibit design refresh or replace to modify." property.
3. Once you have done these steps then, close the database within Domino Designer client
4. Right click the bookmark or database icon then select Database > Refresh Design to refresh the design.

If replacing the database design doesn't help you to resolve the error then, follow the given steps:
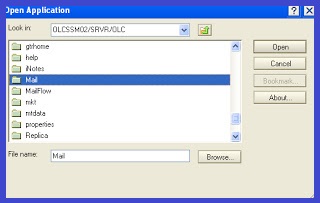
  • Go to File>Open>Lotus Notes Application and open it from the server.
 

  • Go to file folders > Mail.
 
  • Then, Click Open the mail database.
I hope the resolution method will help you to resolve the problem. If the problem still persists, then try Stellar Phoenix Lotus Notes Recovery Software. This software is capable enough to fix any type of error in Lotus Notes database file.
4/30/2013 08:17:00 pm 1

What causes error: "Illegal circular USE: DocExpProcessing" in Lotus Notes?

While working with Lotus Notes, you can receive an error that starts with “Illegal circular USE:”
in several situations such as: copying a design element between database designs , opening or creating database and mail files . This error mainly occurs due to error in mail files, error in LotusScript libraries, database design updates (relative to Notes/Domino templates) or an updated version (relative to custom templates).

Some general scenarios when Lotus Notes user receives the error "Illegal circular USE: " are:
  • While working within a database or mail file
  • While opening database or mail file
  • While creating database or mail file documents
  • While purging database or mail file documents in folders
  • While opening a Notes mail folder
  • While performing the 'Send and File' action in foreign language mail templates
  • Other Lotus database operations
Here, I am discussing the specific case Error: "Illegal circular use: ..." when working within a database or mail file. This may lead to improper functioning of Lotus Notes client or Lotus Domino Web Access and can cause troubles when a user tries to open his mail database.

Causes:
This error is caused due to errors in the LotusScript code such as:
    • Corrupt script library
    • Un updated script libraries
Note: script libraries aren’t up dated, if you enable the "Prohibit design refresh or replace to modify" property for your Lotus Notes.

Before going further to resolve the error, first we must know the way to diagnose the problem so that proper error resolution method can be adopted.

Follow the given steps to diagnose the problem:

To make sure that the database's design elements will be updated whenever refresh or replace occurs, you must ensure that the Refresh/Replace’ property flag or "No Refresh” column (for later Domino Designer clients) isn't checked for database's design elements in Lotus Domino Designer.

1. Check the error message and see what the cited design element is.
2, Open the database using Domino Designer.
3. Go to Shared Code > Script Libraries from the left pane. Check if the library name noted in the error message exists in the script library design elements or not.
4. Ensure whether the "No Refresh" column is checked for the design element or not. Also, see if the "No Refresh" column is checked or not for other database design elements (including Views, Folders, Forms and Subforms etc.)
5. Make sure that prohibit flag is not checked the for the design elements in the source template.

If you have performed all above steps but still facing the same problem then, the error is being caused due to some missing or corrupt database design element. Read my next article to know the ways to resolve Lotus Notes error "Illegal circular USE: DocExpProcessing".
Thursday 25 April 2013
4/25/2013 10:31:00 pm 4

How to export GroupWise Emails to Outlook?

The GroupWise Client provides you various Mail Export options. Using the GroupWise Import Export Wizard, you can easily export GroupWise mails and save them as text files on your computer. Later on, you can import the exported file into another application an access the data stored within it.

In this article, I am going to discuss the method by which you can access your GroupWise Emails in to MS Outlook.

Steps to export GroupWise Emails to Outlook:

1. Click Windows.
2. Go to "Start" > All Programs.


3. From the program groups click "Novell" then, open “GroupWise”.
4. Click "Inbox" from the left panel of GroupWise Email Client.


5. From the inbox, click the email message that you want to be exported. The selected email message will be highlighted. You can select multiple GroupWise email messages by holding the "Ctrl" key and selecting each e-mail to be saved.

6. Right click the selected email messages and click "Save As."


A configuration window will open after clicking "Save As”.

7. From the format options, choose "HTML Message” to save the selected email messages.

After choosing the “save as” format, you need to choose the location to save the output file.


8. From the drop-down box, select the option “Save to Disk” and check the “Report file name conflicts” check box.

9. You can choose to save the exported files into current directory by clicking the browse button (next to the "GroupWise Directory" text box) in the save window and then, choosing a location from the current directory.

You can also create a new folder on your disk or Desktop for saving the exported mails.  If you do not choose any save location, then the exported emails will be saved to "GroupWise" directory by default. 

10. Finally, click the "Save" button to save the selected (highlighted) items.

This will save all of selected email messages on the selected location. It may take few seconds to minutes depending on the number of message and attachments. After completion of the Email export process, the "Save" dialog window will close automatically and the selected email messages will be stored on your hard drive at the location specified by you. You can use the saved mail file as a mean of backup or for importing the saved items to some other application.

Alternate Solution : If you want to save your time and efforts in carrying out the above complex and time consuming method to convert GroupWise mails to Outlook PST, then you can give a shot to Stellar GroupWise to PST Converter, that will make automate the whole conversion task and with a few clicks your GroupWise mails will get converted in Outlook supported format in a timely manner. The software can also be downloaded from here - https://gallery.technet.microsoft.com/Novell-GroupWise-to-5f33e830
4/25/2013 02:50:00 am 0

How to resolve ESE event ID 467 in Exchange?


Exchange database consists of two main components i.e. Information Store and the JET Database Engine. JET Database Engine tracks and maintain all the transaction processing. All database management tasks are handled by information store. It maintains the Exchange user mailbox data in private information store (Priv.edb) and public folders data in public information store (Pub.edb).  

Exchange Information Store is the key component of Exchange database; if it gets corrupt then Exchange server couldn't function properly and will generate several error messages whenever, user tries to access the Exchange mailbox data. ESE Event ID 467 is one of the common errors generated due to Exchange database corruption. 

ESE Event ID 467:
ESE Event ID 467 is generated due to Exchange store database corruption. Exchange Information Store services and JET engine will stop responding when this Event ID has occurs.

Cause: ESE Event ID 467 indicates logical corruption in the Exchange store database. It occurs when secondary index of a table in the Exchange store database gets corrupt or inconsistent. In such situation when you try to insert a record in the table, an index entry will be made that makes the corrupted page to be flushed but the index will not get flushed with the corresponding table. Thus, it generates inconsistency in the Exchange Information Store database.

Resolution:
First locate the corrupt database; you can easily view the location of the corrupted database from the Description section of the event.


Note: You may require installing the supported hot fix, if you cannot view this information about the corrupted database.

Once you have traced the corrupt database, follow these steps to fix the problem: 
1.First, Start Exchange System Manager
2. Dismount the corrupt database
3. Check database inconsistency by running eseutil /g command. 
If it is still showing database corruption then, repair the database using eseutil /p, then run Isinteg -fix. This will fix the page or database level corruption.
4. De-fragment the database by running eseutil /d command. Running (Eseutil /d) will help you to resolve logical corruption in Exchange database.
5. Once you have performing database fragmentation then, use ExMerge to rebuild, and mounting the Exchange database for putting it back into production.

If the problem still persists, delete the corrupt database and use your recent valid backup copy of database to restore it.

ISINTEG command is used to check the Exchange store database corruption related issues and ESEUTIL for dealing the problems with the database engine. Eseutil and Isinteg fail in several situations and can also lead to data loss situations because these utilities delete the corrupted page instead of actually repairing it. So also backup your database before running these commands. 

To overcome the limitations of the inbuilt Exchange Repair utilities, you need some powerful Exchange server recovery software that can perform efficient Exchange database repair without causing any kind of data loss.
Monday 22 April 2013
4/22/2013 12:52:00 am 0

A brief overview of Cached Exchange Mode:


MS Outlook profile Cached Exchange mode can be used when you are using a Microsoft Exchange Server e-mail account .In cache exchange mode the Exchange mailbox data is copied on the local user system in off line storage files (OST files).
Cached Exchange Mode is a great feature of Outlook with Exchange that offers the user flexibility to work without Exchange or work off line in case network connection couldn't be established.

Cached Exchange Mode feature can't be used if:

  • You don't have an Exchange server e-mail account for your Outlook profile 
  • Cached Exchange Mode feature is disabled by the Exchange server administrator
  • If you are using Microsoft Windows 2000 Server or Windows Server 2003 and have installed Microsoft Terminal Services.

When you are working in Cached Exchange Mode and the connection with Exchange breaks then, Outlook automatically switches to 'Trying to connect' status and switches to  'Disconnected mode' if  the connection is still broken. In such situation, you can work off line and access your data. Outlook keeps checking whether the connection with Exchange server is available or not. When the connection is reestablished then, the changes done to the mailbox data (while you were working off line) are automatically synchronized with Exchange database.
For fast Internet connection the header, body, and attachments of an e-mail item are copied from the server to the OST file. For slower Internet connections only headers are automatically downloaded. If you want to download Offline Address Book, body of the Email and associated attachments then, you need to perform additional steps to do it manually. You can set the Outlook to Exchange connection behavior manually. 

Benefits of Cached Exchange Mode:

  • It provides the ability to work offline( choice or due to a connection problem)
  • It  provides quick access to your data
  • Data is frequently updated and synchronized with the mail server.
  • It reduces the amount of data sent over the connection.
  • It shortens the connection time as it offers the facility to work with a local copy of mail data (i.e. OST file).
  • It provides faster access to messages and to attachments because you work from the local copy instead of the server copy.
  • It provides faster user operations & synchronization (Quick flagging, replying, and editing).
  • As we are working with cached copy of data so, small amount of data to be pushed up to the server to keep the mailboxes synchronized. 
  • It preserves all conventional functionality of Outlook such as: you will still be able to receive new e-mail notifications, full Global Address List details, free/busy lookup, public folder access, and delegate support function as expected.  
  • It provides better utilization of bandwidth.
  • It reduces server load because the Email messages and other data are cached locally so, re-opening the same message does not require server transactions. 
  • It reduces network load. After messages have been pulled over the network one time, subsequent access to those messages does not cause additional network traffic. Because messages are also compressed, there is an additional reduction on network load. 
  • It optimizes data transmissions for slower connection

While working in Exchange cache mode, you need to take special care when working a collaborative environment where resources are being shared or when of your mailbox sizes are increasing up to a specific limits .There are several size limitations of the OST files. But we can't deny that The OST files are of great use to an Outlook user. Besides providing the user ability to work off line it has several other uses too however, Sometimes to avail them you need to convert OST file to PST. Check my next article to know more about the OST file in Outlook.
Thursday 18 April 2013
4/18/2013 04:09:00 am 0

How to deal with duplicate Emails in Outlook?

Outlook Duplicates Emails always create an extra headache for the user because they slow down Outlook performance as well increase the email management overhead. The problem can be ignored at first, but grows more severe with the increasing number of duplicate Emails in the Outlook inbox.

Here are some common ways to avoid duplicate Emails in Outlook:
  • Your entire Outlook rules must end in "Stop Processing" actions so that, no duplicate copies of Emails will be received on the Inbox.
  • Multiple running instances of Outlook can cause duplicate copies of the same email arriving in Inbox. So, you must ensure that only one Outlook instance is running.
  • You can check it from the task manager and can close Outlook.exe if multiple instances are running.
  • If you have multiple Email accounts and you are facing duplicate emails in your Outlook inbox then, deleting and recreating the e-mail accounts can help you to eradicate the problem.
  • If you are an Outlook XP user and haven’t upgraded to the latest service pack then, you can face duplicate mails in Outlook inbox. So, upgrade to the latest service pack from Microsoft Product Updates to resolve this problem.
The above described are some of the most common preventive measures that you must take to avoid duplicate Emails in Outlook Inbox. But still if you receive duplicates in your inbox, then you need to delete them. You can delete them manually if they are few in count but if there are large numbers of duplicate Emails in your Outlook Inbox then, it’s a wise choice to use some Outlook duplicate remover tool to remove them.

How to delete duplicate Emails from Outlook?
If you want to delete the Outlook Emails manually then, first you should organize all duplicates together so that they can be deleted quickly.
You can group the mails by:
  • Sorting your view by the Modified field.
  • Using a Modified Today Search Folder
Steps to sort the mail by the Modified date:
1. Go to View-> Arrange By-> Custom then click  'Sort' to open the Sort dialog.(for Outlook 2007 and Previous versions)
If you are using Outlook 2010 then, go to View-> button View Settings-> Sort
2. At the bottom of Sort dialog, Choose 'Date/Time fields from the “Select available columns from:” dropdown list. Then, click Ok.
3. Now, select the 'Modified field' to place it above the Received field.
4. Finally, Click OK to close all the open dialogue boxes.

Steps to sort duplicate mails using a ‘Modified Today Search Folder’:
There is one more method for locating and grouping the duplicate mails together i.e. with the help of ‘Modified Today Search Folder'. This method is preferably used wherever; rules are used to sort your emails. The Search Folder let you search all messages that were modified today. 

Given below are the steps to create a search folder:
1. Go to File-> New-> Search Folder(Outlook 2003 and Outlook 2007 )
Go to Folder tab then click the button New Search Folder (Outlook 2010 )
Note: You can also use the short cut 'CTRL+SHIFT+P ' to open the New Search Folder dialog
2. Click 'Create a custom Search Folder'
3. Click 'Choose'
4. Give a desired name to your folder.   
5. Click 'Criteria' to open the  Search Folder Criteria dialog
6.  Set the time filed to : Modified Today (by choosing from the dropdown list)


The Search Folder let you easily locate duplicates across folders.

Once you have sorted and located the duplicates Outlook mails, you can select all of them and simply press delete to remove them.
Monday 8 April 2013
4/08/2013 07:51:00 pm 0

A Brief glimpse at Outlook OST creation & OST deletion operations:

Outlook OST file is also known as Offline storage table as, it facilitates the working with Outlook data when there is no connection with Exchange or user is in offline mode.

While offline you can work with the OST file as you normally do when connected with Exchange. When the server is connected again, the changes will be automatically updated to the exchange database. This process is called synchronization.

Either only header or full items (header, message body, and attachments etc.) will be synchronized when connection is re- established.

You can use send/receive groups to determine which folders are to be synchronized. You can group Email accounts and folders and set options for them:
  • Download header or message.
  • Online v/s offline behavior
  • Size limit for downloaded messages
Note: You don’t need to set send/receive groups while working Cached Exchange Mode. Only choose folders that you want to be available offline, and then keep those folders synchronized.

How to create an OST file?
1. Go to the Tools menu. (If using Outlook 2007)


Go to File>Info>Account Settings. (If using Outlook 2010)


2. Click Account Settings
3. You will find Microsoft Exchange under Email section. Double-click it.
4. Click More Settings.


5. Go to Advanced tab and click Offline Folder File Settings. Then, click OK to open the Offline Folder File Settings dialog box.


6. Type the desired file path in the File box and click OK.


If the default OST file (Outlook.OST) doesn’t exist you will get a message:


Click OK to create the default OST file (Outlook.OST)
If the default OST file Outlook.OST already exists then, you need to create the new OST file with different name.
7. Click OK
8. click Next,
9. Finally, Click Finish.

How to delete an Offline Folder (.OST) file?

1. Close Outlook client
2. Go to Start >Run.
3. Type  "%APPDATA%\Microsoft\Outlook\"
4. Click OK
5. From the Explorer window locate the .ost file to be deleted.
6. Select the OST file to be deleted then, press DELETE

You can also click the Delete icon from the Outlook toolbar to delete the selected OST file

Like other data files OST files are also prone to corruption. OST corruption will hamper the proper Outlook functioning. In such case you need to repair the corrupt OST file to resume normal Outlook functioning .But sometimes, the corruption level is so high the corruption is so severe that OST repair tools couldn’t help then, it’s better to delete the OST file and create a new one.
Thursday 4 April 2013
4/04/2013 10:53:00 pm 0

How to back up and restore the registry in Windows XP?

A registry is a central hierarchical database that stores the necessary information required to maintain the system configuration, user profile information, ports information, applications, hardware devices, and related settings etc.

Any incorrect modification to the registry can turn your system unusable. So, before going to make any registry change it’s a good practice to backup the registry. So that if something goes wrong, then you can restore the previous settings from the backup of the registry.  

There can be two ways to backup the registry in windows XP:
  • With the Help of  Guided Help(applicable only for windows versions: English version of Windows XP Home Edition, Windows XP Professional, Windows XP Media Center Edition, or Windows XP Tablet PC Edition )
  • Manually backup by using  System Restore
Steps to use this Guided help to backup the registry:
  • Log on to the  Windows  system as an administrator
  • Download the Guided Help from the link: http://support.microsoft.com/?scid=aw;en-us;322756&eula=1
  • Install and to use this Guided Help.
  • The guided help will automatically perform the stesp for exporting registry keys and creating backup of the registry.
Note: you cannot undo any change done by the Guided Help, once it finishes the process.

Steps to back up the Windows XP registry manually:

1. First Turn on the  System Restore
  • Go to System Properties
  • Uncheck the  Turn off System Restore check box

  • Click OK
2. Go to Start>Run
3. Type %System Root%\system32\restore\rstrui.exe


4. After clicking OK,  “Welcome to System Restore page” will open


5. Click the option “Create a restore point” 


6. Click Next. You will be directed to the “Create a Restore Point page”
7. Give a  desired name for the restore point 


8. Click Create
It will create a restore point with the name specified by you.
9. Once the process is completed, click Close.


Note:  In case the System Restore is turned off, you will be prompted to ask whether you want to turn on System Restore now. 


Click Yes and then follow the above given steps to turn on System Restore and then repeat this step.

Steps to restore the registry in Windows XP:
1. Click Start
2. Click Run
3. Type %System Root%\System32\Restore\Rstrui.exe
4. After clicking OK, "Welcome to System Restore page" will open.
5. Click "Restore my computer to an earlier time"
6. Click Next,  "Select a Restore Point page" will open
7. Then click the system checkpoint. 


8. Click  "Guided Help (Registry Backup)" from  the options in the On this list select the restore point area
9. Click Next. It will open A list of configuration changes that will be made by System Restore
10. Click OK to proceed.
11. Click ‘Next’ on the Confirm Restore Point Selection page to proceed further.


It will restore Windows XP to the previous configuration state and then restarts the system.
12. When you will Log on to the computer again you will be asked for System restore confirmation. 
Click OK on System Restore confirmation page to finish the restore process.

I hope this article will be useful for those who are looking for who are looking for registry back up and restore procedure. Your comments are welcome.
Wednesday 3 April 2013
4/03/2013 09:47:00 pm 3

How to fix Outlook Error 0x80042108?

Outlook Error 0×80042108 is a very common error faced by Outlook users while working with Outlook. Outlook Error 0×80042108 can arise in various situations such as: while launching Outlook, performing mail operations (such as sending, receiving, or replying etc.), storing data on PST file etc.

Some consequences/symptoms of the Error 0×80042108 in Outlook:
  • SMTP email messages couldn’t be sent or received.
  • Other mail operations such as mail reply, deletion, or forwarding etc. couldn’t be performed properly.
  • Outlook application fails to start or launch.
  • Outlook application behaves abruptly.
  • Problems while working with Outlook files (such as errors while storing or accessing data).
  • Other Outlook operations such as scheduling tasks, saving contacts etc. couldn’t be performed properly.
Causes of the Outlook Error 0×80042108:
  • You may receive the Outlook Error 0×80042108 if:
  • Your have enabled SSL on your system for your Email account.
  • Norton Internet Security/Norton Personal Firewall 2002 software/ Norton Anti spam add-in installed on your system.
  • Corrupt registry leads to system errors that can cause Outlook Error 0×80042108.
  • Incorrect or unnecessary registry changes done by you or someone else can cause Outlook Error 0×80042108.
  • Some Anti-spam add-in installed in Outlook that conflicts with your Outlook application.
  • Virus or malware Attack
  • Outlook application failure or some other problem with Outlook.
  • Incorrect Outlook configuration.
  • Corrupt or damaged PST files.
  • Improper installation or updation of MS Office
Initially, you can tolerate the error messages if they arise seldom. But if their frequency increases it will hamper your work. And later on, you may have to face severe data loss situations. So, it is necessary to resolve the error 0×80042108 at an earlier stage.

Resolution method:
Tools to fix the error 0×80042108:
  • Outlook provides free inbuilt utility i.e. Inbox repair tool that can be used to resolve the Outlook error code 0×80042108 and other PST corruption related issues. If it fails then you will have to search some alternative PST repair software.
  • The Outlook error code 0×80042108 can also be caused due to some incorrect system configurations, registry or wrong settings. In such situation, the error 0×80042108 can be resoled by fixing your system, with the help of registry cleaners.

Sometimes, just restarting the system is enough to fix the error. So, the technical experts advise the users to restart the system before opting for any of the above methods for fixing the error code 0×80042108 .Instead of system restart, you can also try removing office update, restoring the OS and disabling the antivirus or firewall etc. If these works for you then it is great and If don’t then, you can try the tools mentioned above.